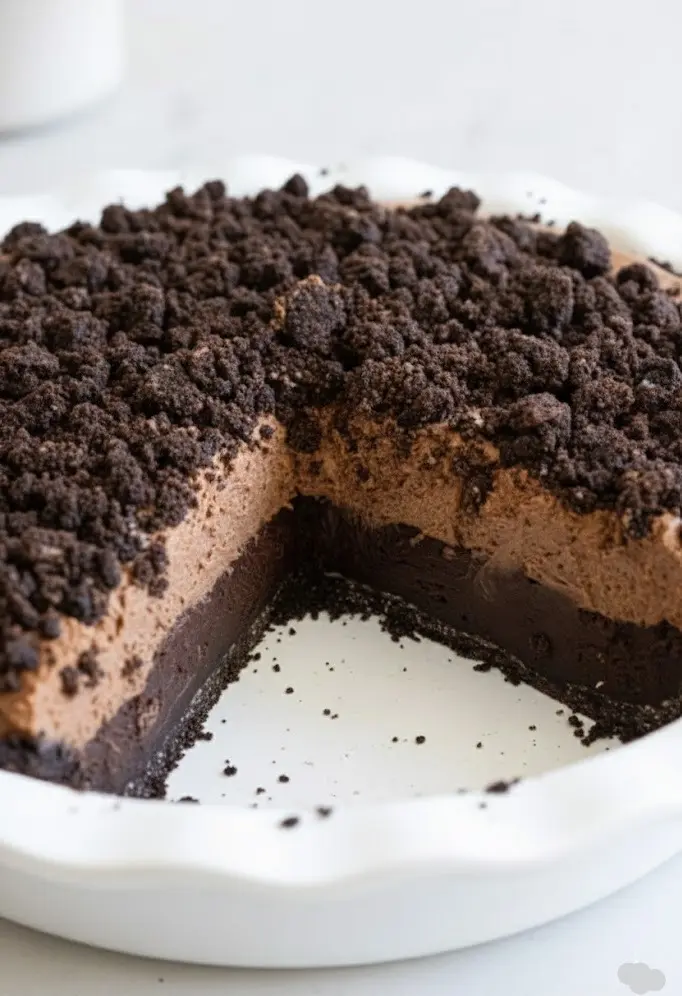
➡️You’ll love this Mississippi Mud Pie it’s the ultimate chocolate lover’s dream—layers of Oreo crust, fudgy brownie, and silky mousse that’ll make you forget store-bought desserts exist.
➡️This showstopper looks fancy but comes together easier than you’d think. Let me walk you through creating this irresistible dessert that’ll have everyone asking for seconds! 🍫
What Makes This Recipe Special ✨
✅Restaurant-Quality Dessert at Home 🏆
Honestly, this tastes like something you’d pay $12 a slice for at a fancy restaurant. The combination of textures—crunchy Oreo base, dense brownie middle, and cloud-like mousse—creates this incredible experience in every bite. (Trust me, it’s worth the effort!)
✅Chocolate on Chocolate on Chocolate 🍫
We’re not holding back here. Three distinct chocolate layers mean serious satisfaction for any chocolate craving. Each layer brings its own flavor profile, from the bitter-sweet brownie to the creamy milk chocolate mousse.
✅Easier Than It Looks 💪
Sure, there are multiple components, but none of them are difficult. You’re basically making simple recipes stacked together. No fancy techniques required—just follow the steps and you’ll nail it.
Serving Size 🍽️
Yields: 8-10 generous slices
Pan Size: 9-inch springform or pie pan
What You’ll Need 🛒
Oreo Crust
- 16 Oreo cookies (whole, with cream filling)
- 1 tablespoon granulated sugar
- 4 tablespoons unsalted butter, melted and cooled
Fudgy Brownie Layer
- 4 ounces bittersweet chocolate, finely chopped
- 3 tablespoons unsalted butter
- 3 tablespoons vegetable oil
- 1½ tablespoons unsweetened cocoa powder
- ⅔ cup dark brown sugar, firmly packed
- 2 large eggs, room temperature
- 2 teaspoons vanilla extract
- ¼ teaspoon salt
- 3 tablespoons all-purpose flour
Oreo Crumble Topping
- 6 Oreo cookies
- 2 tablespoons powdered sugar
- 1 tablespoon unsweetened cocoa powder
- ⅛ teaspoon salt
- 2 tablespoons unsalted butter, melted
Chocolate Mousse
- 6 ounces milk chocolate, finely chopped
- 1 cup heavy cream, very cold (divided: ½ cup + ½ cup)
- 2 tablespoons unsweetened cocoa powder
- 2 tablespoons powdered sugar
- Pinch of salt
- ½ teaspoon vanilla extract
Prep Time Breakdown ⏱️
Active Prep: 30 minutes
Baking Time: 25 minutes
Chilling Time: 4-6 hours (or overnight)
Total Time: 5-7 hours (mostly hands-off)
How Long to Cook 🔥
Brownie Layer: 22-25 minutes at 325°F
Cooling: 30 minutes before adding mousse
Setting: 4-6 hours in refrigerator
Let’s Get Cooking 🍳
Building the Oreo Foundation 🏗️
Preheat your oven to 325°F. In a food processor, pulse the 16 Oreos until you get fine crumbs—think sandy texture, not dust. Mix in the sugar, then drizzle in the melted butter while pulsing. The mixture should stick together when you pinch it.
Press this mixture firmly into the bottom of your 9-inch springform pan. Use the bottom of a measuring cup to really pack it down—you want a solid base here. Bake for 10 minutes, then let it cool while you make the brownie layer. (Actually, you could skip baking the crust if you’re short on time, but I find it holds together better when baked.)
Creating the Brownie Magic 🔥
In a microwave-safe bowl, combine the chopped bittersweet chocolate, butter, and oil. Microwave in 30-second bursts, stirring between each, until completely smooth. Don’t rush this—burnt chocolate is not fixable!
Whisk in the cocoa powder and brown sugar until the mixture looks glossy. Add the eggs one at a time, beating well after each addition. Stir in vanilla and salt. Here’s the thing: don’t overmix once you add the flour. Fold in those 3 tablespoons just until you don’t see white streaks anymore.
Pour the brownie batter over your cooled Oreo crust and spread it evenly. Bake for 22-25 minutes. The center should still look slightly underdone—it’ll continue cooking as it cools. Let it cool completely at room temperature (about 30 minutes).
Making the Mousse Layer ✨
This is where it gets fun! Place your chopped milk chocolate in a heatproof bowl. Heat ½ cup of the heavy cream until it just starts to simmer (don’t let it boil), then pour it over the chocolate. Let it sit for 2 minutes, then stir until silky smooth. Let this cool to room temperature—if it’s too warm, it’ll deflate your whipped cream later.
In a separate bowl, whip the remaining ½ cup cold heavy cream with the cocoa powder, powdered sugar, vanilla, and salt until you get stiff peaks. This takes about 3-4 minutes with an electric mixer.
Fold about one-third of the whipped cream into your cooled chocolate mixture to lighten it up. Then gently fold in the rest—use a spatula and cut down through the center, then sweep along the bottom and up the side. Keep rotating the bowl and folding until just combined. (Side note: a few streaks are fine—overmixing will deflate it.)
Spread this mousse over your cooled brownie layer, creating swirls if you’re feeling fancy. Cover and refrigerate for at least 4 hours, though overnight is better.
Final Flourishes 🎨
About 30 minutes before serving, make your Oreo crumble topping. Crush the 6 Oreos (I just put them in a zip-top bag and go at them with a rolling pin—very therapeutic). Mix with powdered sugar, cocoa, salt, and melted butter until you get chunky crumbs.
Sprinkle this over your chilled pie right before serving. The contrast between the crispy topping and smooth mousse is chef’s kiss.
Cooking Tools & Equipment 🛠️
Essential:
- 9-inch springform pan (makes removal so much easier)
- Food processor (or zip-top bag + rolling pin for crust)
- Electric mixer (hand or stand)
- Microwave-safe bowls
- Rubber spatula
- Whisk
Nice to Have:
- Offset spatula for spreading
- Kitchen scale for precise chocolate measurements
Taste Experience 😋
What It Tastes Like: Imagine the richest, fudgiest brownie meeting a silky chocolate mousse, all sitting on a crunchy Oreo base. The bittersweet chocolate in the brownie keeps it from being too sweet, while the milk chocolate mousse adds creaminess. That Oreo crumble on top? Pure genius—it adds crunch and a cookies-and-cream vibe.
Texture Journey: Each forkful gives you three distinct textures. The crust is firm and cookie-like, the brownie is dense and fudgy (not cakey), and the mousse is light and airy. It’s this contrast that makes it so addictive.
Adjusting to Your Taste: If you prefer less sweet, use dark chocolate instead of milk chocolate in the mousse. Want more intense chocolate? Add an extra tablespoon of cocoa to the brownie layer. I’m not 100% sure about this, but some people add a shot of espresso powder to intensify the chocolate flavor—haven’t tried it myself yet!
Allergen Alert ⚠️
Contains: Dairy (butter, cream), eggs, wheat (Oreos, flour), soy (in chocolate and Oreos)
Common Concerns: This isn’t suitable for anyone with dairy or egg allergies without major modifications. The Oreos contain wheat and soy, so this isn’t gluten-free or soy-free either.
Safe Swaps: You could try dairy-free chocolate and coconut cream for the mousse, but honestly, I haven’t tested it so can’t guarantee the results. For a gluten-free version, use gluten-free chocolate sandwich cookies for the crust.
Nutrition Facts 📊
Per Slice (based on 10 slices):
- Calories: 520
- Fat: 32g
- Carbohydrates: 54g
- Protein: 6g
- Sugar: 42g
Real Talk: This is a special occasion dessert, not an everyday treat. It’s rich, indulgent, and absolutely worth every calorie when you’re celebrating something special! 🎉
Making It Work for You ⚙️
Reducing Sugar: You can cut the sugar in the Oreo crumble by half without affecting texture. The brownie and mousse need their sweetness to balance the chocolate bitterness, though.
Smaller Portions: Cut into 12 slices instead of 8-10 for more reasonable portions. This dessert is rich enough that a small slice satisfies.
Prep-Ahead Option: Make this the day before your event—it actually tastes better after sitting overnight. The flavors meld together beautifully.
Creative Twists 🌪️
Peanut Butter Swirl 🥜
Add 3 tablespoons of creamy peanut butter to the mousse before folding in the whipped cream. Swirl it through for a peanut butter cup vibe. (Game-changer!)
Mint Chocolate Version 🌿
Add ½ teaspoon peppermint extract to the mousse and sprinkle crushed Andes mints on top instead of the Oreo crumble.
Coffee Enhancement ☕
Dissolve 1 tablespoon instant espresso powder into the brownie batter. The coffee doesn’t make it taste like coffee—it just intensifies the chocolate flavor.
Different Cookie Base 🍪
Swap Oreos for chocolate graham crackers, chocolate wafer cookies, or even Nutter Butters if you want a peanut butter base.
Perfect Pairings 🤝
What to Drink 🥤
Coffee is the obvious choice—the bitterness cuts through the richness perfectly. A glass of cold milk works too (very nostalgic). For adults, a port wine or Irish coffee complements the chocolate beautifully.
Complete Dessert Spread 🍽️
Serve this as the centerpiece with fresh raspberries on the side (the tartness balances the chocolate), vanilla ice cream for those who want it, or whipped cream for extra indulgence.
Occasion Ideas 🎉
Perfect for birthday celebrations, dinner parties, potlucks (you’ll be the hero), or honestly, just because it’s Tuesday and you need chocolate therapy.
Making It Look Great ✨
Slicing Tips: Use a sharp knife dipped in hot water and wiped clean between each cut. This gives you those gorgeous, clean slices instead of a muddy mess.
Garnish Ideas: Fresh berries, chocolate shavings, a dusting of cocoa powder, or even a drizzle of chocolate sauce make it look bakery-worthy. Mint leaves add a pop of color.
Plating Suggestion: Serve each slice with a small dollop of whipped cream and a few fresh raspberries on the side. Maybe a mint sprig if you’re feeling fancy. 🌸
Keeping It Fresh 📦
Refrigerator Storage: Cover tightly with plastic wrap or keep in the springform pan with the lid on. Lasts 4-5 days in the fridge—though honestly, it never lasts that long in my house!
Freezing: This freezes beautifully! Wrap individual slices in plastic wrap, then aluminum foil. Freeze for up to 2 months. Thaw in the fridge overnight before serving.
Make-Ahead Timeline: You can make the crust and brownie layer up to 2 days ahead. Add the mousse the day before serving. Add the Oreo crumble right before serving so it stays crunchy.
Pro Tips for Success 💡
Temperature Matters 🌡️
Make sure your eggs are room temperature before adding them to the brownie batter—they incorporate better. But your cream for the mousse needs to be very cold for proper whipping.
Don’t Overbake the Brownie ⏲️
I said 25 minutes, but honestly it might be done at 22. The center should still jiggle slightly when you shake the pan. It firms up as it cools, and you want that fudgy texture, not a cakey one.
Patience with Chilling ❄️
I know waiting 4-6 hours is torture, but the mousse needs that time to set properly. If you try to slice it too early, you’ll get a messy situation. Overnight is actually ideal.
Quality Chocolate 🍫
This isn’t the time to use cheap chocolate chips. Get decent baking chocolate—it makes a real difference in flavor. Ghirardelli or Guittard work great.
Fixing Common Mistakes 🛠️
Mousse Won’t Thicken? The chocolate was probably too warm when you folded in the whipped cream, causing it to deflate. Let the chocolate mixture cool to room temperature next time. If it happens, just chill it longer—it’ll firm up eventually.
Brownie Layer Cracked? That’s actually fine—the mousse covers it! But if you want to avoid it, don’t overbake and let it cool gradually at room temperature.
Crust Falling Apart? You didn’t press it firmly enough or didn’t add enough butter. Make sure the mixture holds together when pinched before pressing it into the pan.
Pie Won’t Release from Pan? Run a thin knife around the edge before releasing the springform. If using a regular pie pan, line it with parchment paper before starting.
Quick Answers ❓
Can I make this without a springform pan?
Yes, but serving is trickier. Use a regular pie pan and cut slices carefully, or line any pan with parchment paper with overhang so you can lift the whole thing out.
How do I know when the brownie layer is done?
A toothpick inserted in the center should come out with a few moist crumbs—not wet batter, but not completely clean either. It should still jiggle slightly in the center.
Can I use dark chocolate for the mousse instead of milk chocolate?
Absolutely! It’ll be less sweet and more intensely chocolatey. You might want to add an extra tablespoon of powdered sugar to balance the bitterness.
What if I don’t have a food processor for the crust?
Put the Oreos in a zip-top bag, seal it, and crush them with a rolling pin or the bottom of a heavy pan. Works just as well!
Can I make this dairy-free?
You’d need to substitute coconut cream for heavy cream and use dairy-free chocolate and cookies. I haven’t tested this version myself, so results may vary.
Is this better the next day?
Actually, yes! The flavors meld together and the texture becomes even more cohesive. Make it a day ahead if possible.
My Take on This Recipe 💭
Look, I’ll be honest—this isn’t a quick weeknight dessert. But when you want to absolutely blow people away, this is your recipe. The first time I made it, I thought “three layers seems excessive,” but then I tasted it and immediately understood. Each layer brings something essential to the party.