Get ready because Boston Cream Pie Cookies are about to become your new favorite dessert hybrid!
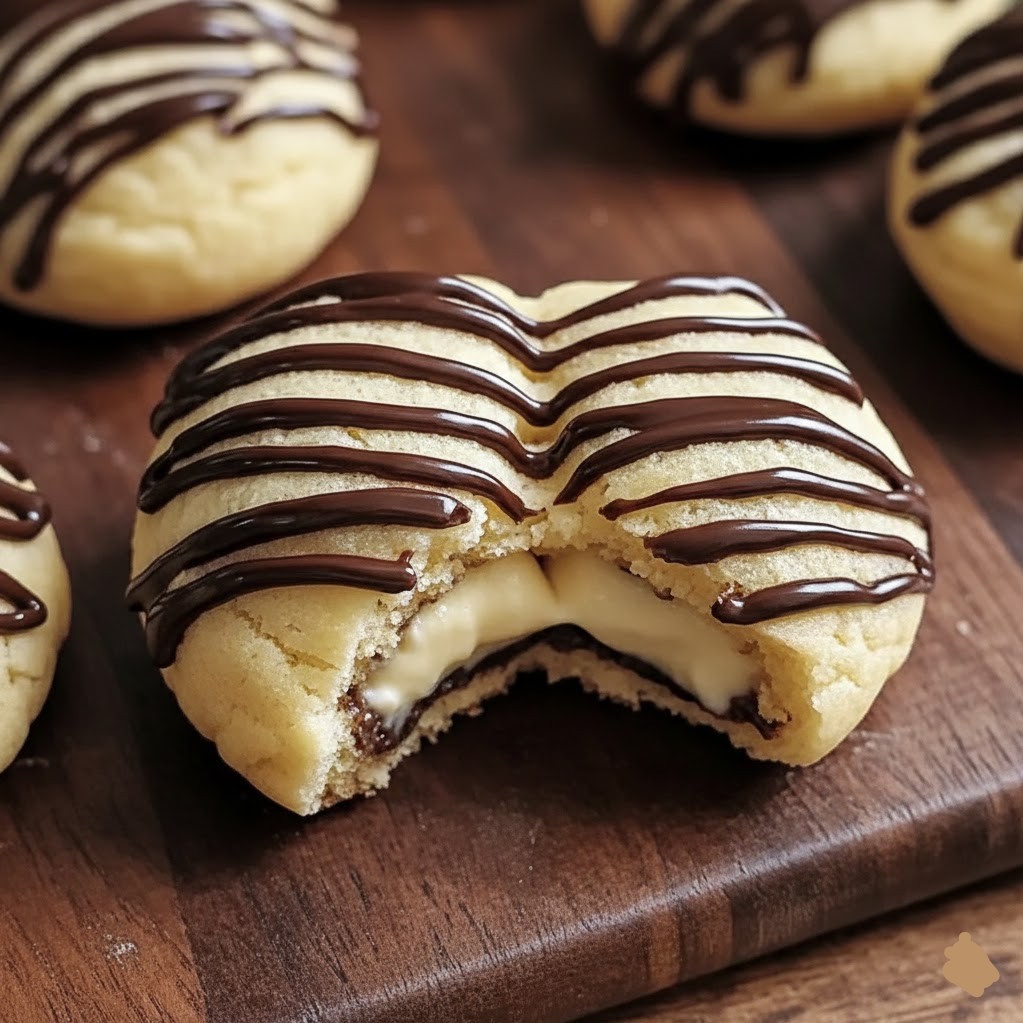
These soft, pillowy cookies capture all the magic of the classic Boston cream pie—rich vanilla custard, soft cake-like texture, and that irresistible chocolate topping—but in cookie form.
I’ll walk you through every step to make these bakery-worthy treats at home. 🍪✨
Why This Recipe Works So Well 🎯
Bakery Taste at Home: These cookies deliver that classic Boston cream pie flavor without needing any fancy pastry skills (trust me, I’m not a pastry chef either).
Soft Cookie Texture: The combination of butter, sugar, and the right leavening agents creates cookies that stay soft for days—not those hard, crunchy ones that hurt your teeth.
Make-Ahead Friendly: You can prep the components separately, which makes these perfect for entertaining or when you’re planning ahead.
Recipe Yield 🎯
This recipe makes approximately 24-30 cookies (12-15 sandwich cookies), depending on your cookie size. Honestly, I usually make them a bit bigger than standard because who wants a tiny Boston cream pie cookie? Each serving is one assembled sandwich cookie.
What You’ll Need 📝
For the Cookie Base
2 cups All-Purpose Flour: This gives you the perfect tender texture (whole wheat works too, but they’ll be denser)
1 teaspoon Baking Powder: Make sure it’s fresh—I learned this the hard way when my cookies didn’t rise
1/2 teaspoon Baking Soda: Works with the baking powder for that nice lift
1/4 teaspoon Salt: Just enough to balance the sweetness
1/2 cup Unsalted Butter, softened: Room temperature is key here
3/4 cup Granulated Sugar: Or use brown sugar for a richer, almost caramel-like flavor
1 large Egg: Brings everything together
1 teaspoon Vanilla Extract: The real stuff tastes so much better than imitation
2 tablespoons Whole Milk: This actually makes the cookies tender (I forgot to mention this is crucial!)
For the Vanilla Custard Filling
1 1/2 cups Whole Milk: The fat content matters for richness
1/3 cup Granulated Sugar: Sweet but not overwhelming
3 tablespoons Cornstarch: This is what thickens everything up
3 large Egg Yolks: Save those whites for another recipe
2 tablespoons Unsalted Butter: Added at the end for silkiness
1 tablespoon Vanilla Extract: Go generous here—it’s the star flavor
Pinch of Salt: Enhances all the flavors
For the Chocolate Topping
1 cup Semi-Sweet Chocolate Chips: Dark chocolate works great too if you want something less sweet
2 tablespoons Vegetable Oil: Coconut oil works and adds a subtle flavor
1 tablespoon Light Corn Syrup (optional): Makes the chocolate extra shiny and smooth
Time to Prep 📅
Prep Time: 30 minutes (including making the custard)
Chilling Time: 2 hours minimum for the custard (or overnight is even better)
Cookie Prep: 15 minutes to mix the dough
Total Cook Time 🔥
Baking Time: 10-12 minutes per batch
Cooling Time: 15 minutes for cookies
Assembly Time: 20 minutes
Total Time: About 3 hours (including chilling time)
Let’s Get Cooking 🍳
Making the Custard First 🥣
Start with the custard because it needs time to chill—I usually make this the night before, actually. In a medium saucepan, whisk together the milk, sugar, and cornstarch until smooth. Here’s the thing: you want to whisk out ALL the lumps before you start heating. Add the egg yolks and whisk again until everything’s completely smooth.
Place the saucepan over medium heat and cook, whisking constantly (and I mean constantly—don’t check your phone during this part). The mixture will start to thicken after about 5-7 minutes. Once it reaches a pudding-like consistency and starts to bubble, remove it from heat immediately. Stir in the butter, vanilla extract, and salt until the butter melts completely.
Transfer the custard to a bowl and press plastic wrap directly onto the surface (this prevents that weird skin from forming). Refrigerate for at least 2 hours, but overnight is honestly better because it gets firmer and easier to work with.
Preparing Your Cookie Dough 🍪
While your custard chills (or the next day), let’s make the cookies. Preheat your oven to 350°F and line two baking sheets with parchment paper. In a medium bowl, whisk together the flour, baking powder, baking soda, and salt. Set this aside.
In a large bowl, cream the softened butter and sugar together using an electric mixer on medium speed for about 2-3 minutes until it’s light and fluffy (it should look almost white and airy). Beat in the egg and vanilla extract, then add the milk. The mixture might look slightly curdled—that’s totally normal, don’t panic like I did the first time.
Gradually add the dry ingredients to the wet ingredients, mixing on low speed just until combined. Don’t overmix here or you’ll end up with tough cookies instead of tender ones (game-changer tip right there).
Baking the Cookies 🔥
Using a cookie scoop or spoon, drop rounded tablespoons of dough onto your prepared baking sheets, spacing them about 2 inches apart. These spread a little but not too much. Bake for 10-12 minutes—you want them to be set around the edges but still soft in the center. They’ll look slightly underbaked, and that’s exactly what you want.
Let the cookies cool on the baking sheet for 5 minutes (they’re too delicate to move right away), then transfer them to a wire rack to cool completely. Side note: these smell absolutely amazing while baking, so prepare yourself.
Making the Chocolate Topping 🍫
Combine the chocolate chips and oil in a microwave-safe bowl. Microwave in 30-second intervals, stirring between each one, until smooth and melted. If you’re using corn syrup, stir it in now. Let this cool for about 10 minutes so it’s not piping hot when you use it (trust me on this).
Assembly Time 🎨
Here’s where it all comes together! Flip half of your cooled cookies upside down. Spoon or pipe about 1-2 tablespoons of custard onto each upside-down cookie. Top with another cookie to make a sandwich, pressing gently so the custard spreads to the edges (but not so much that it squeezes out everywhere).
Dip the top of each sandwich cookie into the chocolate topping, or drizzle it over the top—whatever works for you. I usually do half-dipped because it looks fancier, but honestly, both ways taste identical. Place them on a wire rack or parchment paper and let the chocolate set for about 30 minutes at room temperature (or pop them in the fridge for 10 minutes if you’re impatient like me).
Cooking Tools & Equipment 🛠️
Essential: Medium saucepan, whisk, mixing bowls (at least 3), electric mixer (or strong arms), cookie sheets, parchment paper, wire cooling rack
Helpful: Cookie scoop for uniform sizes, piping bag for the custard (though a spoon works fine), offset spatula for chocolate
Taste Experience 👅
These cookies are basically Boston cream pie reimagined. The cookie itself is soft and cake-like with a subtle vanilla flavor—not too sweet on its own. The vanilla custard filling is creamy, rich, and perfectly sweet (it’s like the best vanilla pudding you’ve ever had). Then you get that semi-sweet chocolate on top that adds a slight bitterness to balance everything out.
Main Flavor Notes: Vanilla custard, sweet cream, chocolate, buttery cookie
Texture: Soft, slightly chewy cookie exterior with a smooth, creamy filling and a thin chocolate coating that cracks slightly when you bite into it
Nutritional Information 🥗
Per serving (1 sandwich cookie): Approximately 280-320 calories, 14g fat, 38g carbohydrates, 4g protein
Keep in mind these are treats, not health food (though they do have eggs and milk, so there’s some protein and calcium in there). The custard filling adds most of the calories, but it’s also what makes these special.
Creative Twists 🌪️
Chocolate Cookies: Swap 1/4 cup of flour for cocoa powder in the cookie dough for chocolate cookies with vanilla filling
Different Fillings: Try chocolate custard, coffee-flavored custard, or even store-bought vanilla pudding in a pinch (it’s not quite the same, but it works)
White Chocolate Topping: Use white chocolate instead of semi-sweet for a sweeter version
Mini Versions: Make smaller cookies for bite-sized treats—perfect for parties
Actually, forget what I just said about the pudding—homemade custard really is worth the extra effort because the texture is so much better.
Perfect Pairings 🤝
Beverage Ideas: These pair incredibly well with coffee (especially a cappuccino), cold milk, or even a dessert wine if you’re feeling fancy
When to Serve: Perfect for afternoon tea, dessert parties, potlucks, or whenever you want to impress someone with your baking skills
Complete Dessert Table: Serve alongside fruit salad and some vanilla ice cream for a full Boston cream-themed spread
How to Serve This 🎯
Serve these at room temperature for the best texture—the custard gets too firm when cold and the cookies lose some of their softness. Arrange them on a platter and watch them disappear (seriously, they go fast).
Presentation Tip: Dust the tops with a tiny bit of powdered sugar right before serving for an extra fancy look, or drizzle extra chocolate in a zigzag pattern.
Keeping It Fresh 🌿
Storage: Keep assembled cookies in an airtight container in the refrigerator for up to 3 days. The cookies might soften a bit from the custard, but honestly, I think they’re even better that way.
Make-Ahead: Bake the cookies up to 2 days ahead and store them in an airtight container at room temperature. Make the custard up to 3 days ahead. Assemble within a few hours of serving for the best texture.
Freezing: I’m not 100% sure about freezing these assembled because the custard might get weird when thawed. But you can definitely freeze the unfilled cookies for up to 3 months.
Pro Tips for Success 💡
Room Temperature Everything: Your butter, egg, and milk should all be at room temperature for the cookie dough—this creates a better texture
Don’t Overbake: These cookies should look slightly underdone in the center when you pull them out. They’ll continue cooking on the hot pan for a few minutes
Custard Thickness: If your custard seems too thick after chilling, whisk it vigorously to loosen it up before assembling
Chocolate Consistency: If your chocolate topping is too thick to dip, add a little more oil (half a tablespoon at a time) until it’s the right consistency
Cookie Uniformity: Use a cookie scoop to make sure all your cookies are the same size—this makes pairing them up for sandwiches so much easier
Common Issues & Fixes ⚠️
Cookies spreading too much? Your butter might have been too warm, or the dough needs to chill for 15-20 minutes before baking
Custard too runny? You didn’t cook it long enough—it needs to bubble for at least a minute after thickening. You can always put it back on the heat
Custard has lumps? Strain it through a fine-mesh sieve before chilling (I should have mentioned this earlier, actually)
Chocolate won’t harden? It might be too warm in your kitchen—pop them in the fridge for 10-15 minutes
Cookies too hard? You probably overbaked them or overmixed the dough—they should be soft and cake-like
Quick Answers ⚡
Can I use store-bought custard? Yes, but homemade tastes so much better and has a better texture. If you use store-bought, get the thick kind that comes in a tub, not the pourable kind.
How far ahead can I make these? Best assembled the day you plan to serve them, but the components can be made 2-3 days ahead and stored separately.
Can I make these without eggs? The custard really needs egg yolks—that’s what makes it custard. You could try using a flax egg in the cookies, but I haven’t tested that myself.
Will these work with gluten-free flour? Probably, but I haven’t tried it. Use a 1:1 baking blend and maybe add 1/4 teaspoon xanthan gum if your blend doesn’t include it.
Can I pipe the custard instead of spooning it? Absolutely! Put it in a piping bag with a large round tip—makes it much neater and easier to control the amount.
What if I don’t have corn syrup for the chocolate? It’s optional anyway—the chocolate will still taste great without it, just won’t be quite as shiny.
Final Thoughts ❤️
These Boston Cream Pie Cookies are one of those recipes that look way more complicated than they actually are. Yes, there are several steps, but none of them are difficult (and I said 5 minutes for the custard earlier, but honestly it might take 7-8 minutes depending on your stove). The result is this amazing combination of soft cookie, creamy custard, and chocolate that tastes like you spent all day in a bakery.